.png)

-bpoi.png)
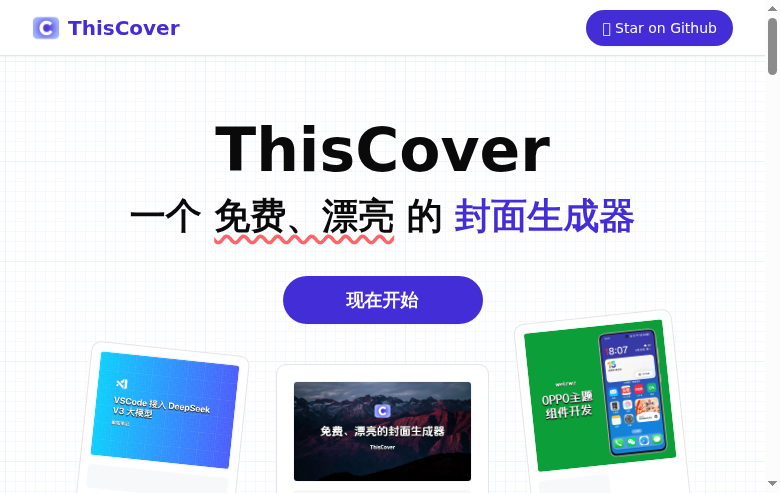
ThisCover:免费开源的封面生成器,4种部署方式详解
前言
今天给大家介绍一款免费、漂亮、完全开源的封面生成器——ThisCover。
无论你是写博客、做公众号、拍视频还是开发项目,一个高颜值的封面能让你的内容瞬间脱颖而出。
项目地址: https://github.com/weizwz/cover
在线体验: https://cover.weizwz.com
功能特性
核心功能
ThisCover 基于 CoverView 全新架构升级,使用了以下技术栈:
- Next.js v16
- React v19
- shadcn/ui
- Tailwind CSS v4
- Lucide Icons
已实现功能
| 功能 | 说明 |
|---|---|
| 文字汉化 | 全中文界面 |
| 免费字体 | 29款开源/可商用中文字体 |
| 纹理主题 | 18种纹理背景 |
| 尺寸比例 | 9种常用比例(1:1、16:9等) |
| 背景选项 | 单色、渐变、上传图片、在线图片 |
| 输出格式 | PNG、JPG、WebP |
| 放大倍数 | 0.5x - 5x |
| 图标库 | 3000+图标(Iconify) |
| 主题样式 | 左文右图、手机预览、桌面预览 |
| 快捷操作 | 复制到剪贴板、本地配置保存 |
部署方式
方式一:Vercel 部署(推荐)
Vercel 是 Next.js 官方推荐的托管平台,部署最简单。
步骤1:Fork 项目
打开 GitHub 仓库,点击右上角 Fork 按钮。
步骤2:部署到 Vercel
- 登录 Vercel
- 点击 Add New → Project
- 选择你 Fork 的仓库
- 点击 Deploy
步骤3:配置环境变量
在 Vercel 项目设置中添加:
NEXT_PUBLIC_API_ACCESS_KEY = 你的Unsplash_API_Key
NEXT_PUBLIC_API_ICONIFY_URL = https://api.iconify.design
如何获取 Unsplash API Key?
- 访问 Unsplash Developers
- 注册/登录账号
- 点击 New Application
- 填写应用信息并提交
- 复制 Access Key
方式二:Docker 部署
适合有服务器或 NAS 的用户。
前置要求
- Docker >= 20.10
- Docker Compose >= 2.0
快速部署
# 克隆项目
git clone https://github.com/weizwz/cover.git
cd cover

# 创建环境变量文件
cat > .env << 'EOF'
NEXT_PUBLIC_API_ACCESS_KEY=你的Unsplash_API_Key
NEXT_PUBLIC_API_ICONIFY_URL=https://api.iconify.design
EOF

# 构建并启动
docker build -t thiscover .
docker run -d -p 3000:3000 --name thiscover --env-file .env thiscover
访问 http://你的服务器IP:3000
Docker Compose 方式
创建 docker-compose.yml:
version: '3.8'
services:
  thiscover:
    image: thiscover:latest
    container_name: thiscover
    ports:
      - "3000:3000"
    environment:
      - NEXT_PUBLIC_API_ACCESS_KEY=你的Unsplash_API_Key
      - NEXT_PUBLIC_API_ICONIFY_URL=https://api.iconify.design
    restart: unless-stopped
启动:
docker-compose up -d
方式三:Cloudflare Pages 部署
Cloudflare Pages 提供免费托管,全球 CDN 加速。
部署步骤
- 登录 Cloudflare Dashboard
- 进入 Workers & Pages → Create application → Pages
- 选择 Connect to Git
- 连接你的 GitHub 仓库
- 设置配置:
| 配置项 | 值 |
|---|---|
| Production branch | main |
| Build command | npm run build |
| Build output directory | .next |
- 添加环境变量(同 Vercel)
- 点击 Save and Deploy
方式四:手动部署
适用于本地开发或自定义服务器。
环境要求
- Node.js >= 18.0
- npm / yarn / pnpm
安装步骤
# 克隆项目
git clone https://github.com/weizwz/cover.git
cd cover

# 安装依赖
npm install

# 创建环境变量文件
cat > .env.local << 'EOF'
NEXT_PUBLIC_API_ACCESS_KEY=你的Unsplash_API_Key
NEXT_PUBLIC_API_ICONIFY_URL=https://api.iconify.design
EOF

# 启动开发服务器
npm run dev
访问 http://localhost:3000
生产环境
# 构建
npm run build

# 启动
npm start
一键部署脚本
适用于 Linux 服务器:
#!/bin/bash
# ThisCover 一键部署脚本

PORT=3000
APP_NAME="thiscover"
INSTALL_DIR="/opt/thiscover"

echo "开始部署 ThisCover..."

# 检查 Docker
if ! command -v docker &> /dev/null; then
    echo "请先安装 Docker"
    exit 1
fi

# 输入 API Key
read -p "请输入 Unsplash API Key: " API_KEY

# 克隆项目
if [ -d "$INSTALL_DIR" ]; then
    cd $INSTALL_DIR && git pull
else
    git clone https://github.com/weizwz/cover.git $INSTALL_DIR
    cd $INSTALL_DIR
fi

# 创建环境变量
cat > .env << EOF
NEXT_PUBLIC_API_ACCESS_KEY=$API_KEY
NEXT_PUBLIC_API_ICONIFY_URL=https://api.iconify.design
EOF

# 重启服务
docker stop $APP_NAME 2>/dev/null || true
docker rm $APP_NAME 2>/dev/null || true
docker build -t $APP_NAME .
docker run -d --name $APP_NAME -p $PORT:3000 --env-file .env --restart unless-stopped $APP_NAME

echo "部署完成!访问地址: http://你的服务器IP:$PORT"
反向代理配置
Nginx
server {
    listen 80;
    server_name cover.yourdomain.com;

    location / {
        proxy_pass http://127.0.0.1:3000;
        proxy_http_version 1.1;
        proxy_set_header Upgrade $http_upgrade;
        proxy_set_header Connection 'upgrade';
        proxy_set_header Host $host;
    }
}
配置 HTTPS
sudo certbot --nginx -d cover.yourdomain.com
常见问题
Q: Unsplash API Key 免费吗?
A: 有免费额度足够个人使用,需要到官网申请。
Q: 生成的图片有水印吗?
A: 没有,完全免费可商用。
Q: Docker 部署内存不足怎么办?
A: 添加内存限制:docker run -d --memory=2g ...
Q: 如何更新版本?
A: git pull && docker build -t thiscover . && docker-compose up -d
总结
| 部署方式 | 难度 | 推荐指数 |
|---|---|---|
| Vercel | ⭐ 简单 | ⭐⭐⭐⭐⭐ |
| Docker | ⭐⭐ 中等 | ⭐⭐⭐⭐ |
| Cloudflare Pages | ⭐ 简单 | ⭐⭐⭐⭐ |
| 手动部署 | ⭐⭐⭐ 较难 | ⭐⭐⭐ |
推荐小白用户使用 Vercel,一键部署无需服务器!